
Computers intimidate me. They also fascinate me. I work with them day in and day out, often trying to change them, but never really understanding them. (I guess I could say the same thing about women).
About five years ago I made a move that changed my life for the better. (Regarding computers, not women). It's probably the most important computer decision I ever made. Although this could help anybody, it is especially useful for videographers.
I installed a removable hard drives on my computer. They consist of a tray that holds the hard drive, and a frame that you install in your computer. The mechanism allows you to turn a key switch and pull a hard drive out of your computer (tray and all), and insert a different one in it's place.
Before I go into my song and dance about the advantages of removable hard drives, let me first explain that none of this is for the faint of heart. Replacing your fixed hard drive with removable ones involves open-computer-surgery. The process isn't particularly complicated, but any time you open your computer Murphy's Law has a way of stepping in with it's own agenda. Be aware that after you botch the job, you may have to visit the local computer guru (or any ten year old boy in the neighborhood) to get Old Beelzebub working again.
THE ADVANTAGES OF REMOVABLE HARD DRIVES
The advantages of removable hard drives fall into two categories:
Advantages to videographers:
You have most likely read elsewhere that every videographer should have two hard drives, one for the operating system (Windows, etc.) and their editing programs, and the other drive for their video data. This assures that the drive that plays or records the video data has no other jobs to do, such as carrying out program commands or Windows functions. Some people partition a single drive into two drive letters to accomplish this, but it doesn't work as well as setting aside a complete drive just for this one job. Besides, the video data drive could be a "souped-up" drive that is huge and swift.
Imagine you are doing an editing project for one client and a rush job comes along. Trying to edit two jobs on the same hard drive may be impossible because there is usually more material than the drive will hold. You may end up moving the project off the drive onto some other storage medium so that you can record the footage for the rush job.
If you had a removable drive, you would simply shut down your computer, turn a key switch, pull the data drive out (with all of the old, half completed project intact), and place it on the shelf. You would then insert a new empty, formatted hard drive, turn the key switch, power up the computer, and within four minutes be ready to receive the new footage onto your drive.
Changing back to the old project is just as simple, and takes about four minutes. If you are a big shot, editing nine projects for nine different clients at once, all you need is one computer and nine removable drives. Incidentally, you could have two or more computers with compatible drive bays so that one person could work on one project while another worked on another and it wouldn't matter which computer did what. In fact some video shops find it cheaper to outfit one computer with the best graphics tools (scanner, graphics tablet, accelerated video card, drawing and animation software), while another computer specializes in editing, and is outfitted with a IEEE1394 card and other hardware. Some people have a separate computer outfitted with special audio capture hardware and software and keep it in a music room with all their MIDI musical instruments. In such a case, the entire project on a removable hard drive can travel from one computer to the next for finishing the animation, sound track, and video editing parts of the project .
Advantages For the General Computer User:
This brings me back to where I started this story. The number of things that can go wrong with a computer are almost infinite. Maybe I'm clumsier or denser than most, but every time I install new software something goes wrong somewhere. If I install a new board, the computer crashes. If I upgrade to WindowsME, the computer crashes. If I add more memory, the computer crashes. If I install a faster processor, the computer crashes. As I innocently read my e-mail, I pick up a virus and ............ If your experience has been different from mine, then bless you! The gremlins that you don't have are living happily at my house.
This experience has taught me to back up everything, and do it frequently. If you don't back up your work, your innocence will be shattered eventually. That's not a maybe, that's a will be. So what do you do?
You could use the Windows backup and restore feature where Windows compresses all your data and allows you to transfer it to other discs. I've tried that but it's labor intensive and I never knew whether the backup feature really worked unless I did a restore which reversed the process and decompressed the data back onto my hard drive. Did you know that sometimes this process doesn't work? Did you also know that this process is hard to do if Windows has crashed and nothing works? I have had a virus (or some other hobgoblin) come in and repartition my C: drive so that my computer can't even find the drive. Try restoring to a drive that doesn't exist.
Maybe you are using Windows Millennium and attempt to use the "restore to an earlier date" feature that makes your computer think that it was a couple weeks ago before you jumbled everything up. Well, surprise: that program just restores the registry, the thing that tells your computer what programs are installed and where to find them. Sure, stepping back to a previous state will solve some problems, but it won't fix a program that has gone whacko and is stepping on other programs on your computer. It also won't fix a virus.
Does any of your scanning or editing software have it's own proprietary directory---not the regular Windows directory---but their own special directory? Normally when you delete something from Windows, it goes into the Recycle Bin where you can retrieve it later. Programs that set up their own directories may have a garbage can icon to which you drag an item rather than using the keyboard's delete button. Where does it go once it's in the garbage can? Is there an undo? (If there is, it's invariably grayed-out when I need it the most). More than once I have dragged what I thought was a single item to the garbage and found out I was dragging the entire directory to the garbage can, leaving me with absolutely nothing and no place to go to retrieve my lost files.
I could go on and on, telling how I installed a scanner and software, which also installed TextBridge, an optical character recognition program which destroyed my computer's ability to click on a file and use "send to" to open the file using an assortment of programs in my computer (such as Notepad, Wordpad, Word, or a number of graphics programs). Fixing the problem required romancing the Windows Registry. Brrrr.
So what does all this caterwauling have to do with removable drives? Because they provide the one absolutely guaranteed method of getting you out of any fix.
Getting Out Of Any Fix:
Here's what do what I do with my removable drives. Assume for a moment that my Windows and system files are on the C: drive and for the moment I am not using my D: drive for video data. I shut down my computer, insert a blank drive into the D: slot in my computer and boot using some disc imaging software from my A: floppy drive. The software allows my to make a mirror image of my C: drive onto my D: drive. For 3GB of data, this process may take 45 minutes, so I go away and have supper while it's happening. When done, I power down, remove my D: drive and put it on the shelf, restart the computer and continue computing as if Murphy didn't exist. When the inevitable screwup occurs, and Windows no longer functions, perhaps with the Blue Screen of Death or with a virus or with some other entanglement from installing software or hardware on my computer, I simply take a deep sigh, shut down the system, remove the C: drive, insert my backup into the C: drive, and restart the computer. The computer will return to the state that it was in when I made the backup copy. I'm back in business and the process took about 4 minutes. Once I'm happy that everything is working okay, I'm inclined to immediately back up my good drive (onto the screwed-up drive), keeping that on the shelf in wait for my next visit from Murphy.
Yes you can do this using a tape backup, but tape backups take a long time to employ. Most of them cost more than a hard drive anyway. You can try backing up to a DVD, or several DVDs if you have that much data, but the process still involves several steps and takes a long time. Also DVD burners cost a kilobuck. My removable drive process is a no-brainer: Dismount the bad drive, shove in the good backup drive, and you return to business: no thinking, no questions, no conversions, no excuses. Anyone who depends on their computer staying up, will probably find these removable drives to be the "perfect" insurance policy.
***********************
Popular Uses for Removable Hard Drives
1. Insurance against hard drive failure, viruses, software screwups, and catastrophic user errors. In the case of drive failure, you simply switch to the backup drive and throw the old drive away. In other cases, you copy your backup drive, and continue working.
2. Multiple uses on a single computer. Each user can have their own hard drive with their preferred operating system and software. This way, games and viruses don't get mixed up with business data on the drive.
3. Multiple operating systems. One drive could be formatted for Windows95 while another is updated to WindowsME.
4. Switch data-intensive jobs quickly. Place one client's editing job and video resources on one drive and another client's resources on another drive. Simply switch drives to switch jobs, a process taking about 4 minutes.
5. Transferring data. You can transfer 20GB of data from one machine to another nearby in about 4 minutes by removing the drive and carrying it manually.
6. Data security. Removing a drive from the computer keeps it away from prying eyes, or accidental erasure. Data backups can be kept in a separate building guaranteeing total protection against theft, fire, or locusts.
7. Upgrading drives becomes easier. Instead of opening the computer to replace an obsolete hard drive, you simply pull out the drive tray and swap the drives in the tray. The drives are easy to connect and reach.
8. Hard drives are relatively cheap. You can afford several.
**********************
CONNECTING REMOVABLE DRIVE HARDWARE
Assuming I have convinced you that removable hard drives are the best thing since sliced watermelon, the next step is selecting the hardware. Removable drives (also called mobile racks) are sold in the larger computer stores like Comp USA, and can be found at most of the travelling computer shows. Personally, I bought mine through the internet from a company called Gigagon (tel. 514-990-7787 or www.standardnetworking.com or www.standardtelephone.com. ) They have a wide selection, a helpful website, and their prices are competitive.
Prices start at about $20 for flimsy plastic models (which I use) and range to about $50 for heavy duty plastic. $70 buys an aluminum enclosure that is more durable and dissipates heat better. $100+ buys SCSI models and models built to military specs.
If you expect to be removing the drive about once a week or less, the inexpensive plastic models will do just fine. If you will be yanking the drives once a day, you may want the ABS plastic or Nylon or aluminum models costing more. Their cases, plugs, and sockets are more robust and reliable in heavy use.
Older IDE (Integrated Drive Electronics) hard drives were rated IDE33 (also called DMA33) which describes the maximum speed that the drive could output data. Today's computers and hard drives are likely to be the sprightlier EIDE66, or EIDE100 (the E stands for Enhanced, but many people leave the E off, calling the drives IDE). Unless you get an old model mobile rack, the newer models can handle all three IDE speeds, so you have nothing to worry about there. Put another way, a new rack with an old drive will work, as will a new drive with an old rack, albeit at the slower speed of either. If instead of IDE you use superfast professional SCSI drives and controller, you will need to buy rack kits designed for SCSI.Drive racks are also available in the new serial or SATA configuration (they don't use bulky ribbon cable).
Hard drives, especially the 7200rpm models, generate a lot of heat, so nearly all mobile racks come with built-in fans. The cheaper "sleeve bearing" fans tend to have their shafts clog up with dust and become noisy earlier in their lifetimes. The higher-priced racks with "ball bearing" fans have a longer, quieter life.
Compatibility
Your biggest decision will be your first decision; what manufacturer and model to buy. Once you buy a particular model, you need to stick with it because the other manufacturers and even other models from the same manufacturer are unlikely to be compatible with it. You probably will want to buy several racks at once of the same brand and model, so that they are interchangeable. If you find out a year later that you need one more removable drive, it can be a hassle trying to find the exact same manufacturer and model.
The biggest mistake people make is to purchase several cheap mobile racks, and when they start to wear out or are underperforming, they have to throw out the whole batch in order to upgrade to a better model. It is best to spend a few extra bucks in the beginning and buy a high enough quality rack so that you can keep that same model over the years, adding to it if you find you need more (assuming they are still made).
The three most popular mobile rackmakers are RH, SI, and SNT. Another manufacturer, Kingston Data (kingston.com) makes professional $165 models. Beware of buying off-brands because they are more likely to be discontinued when you decide to buy more.
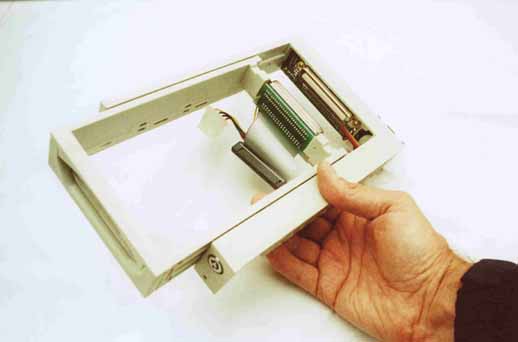
The rack tray (shown without the drive) slides
into the frame. The frame mounts to your computer.
Front is to your left here.
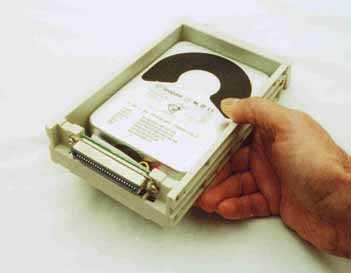 Tray
with hard drive mounted. Front is to the rear here.
Tray
with hard drive mounted. Front is to the rear here.
MAKING THE INSTALLATION
If you have ever installed a CD-ROM or CD-RW in your computer, then you have been through all this exercise before. The process is fairly straightforward but as you can tell from the beginning of this article, Murphy has legions of gremlins lined up and ready to bite.
First you need a computer with two or more empty drive bays. Many computers today come with three 5-1/4 inch front-accessible drive bays, one of which already holds a CD-ROM or CD-RW drive. Taller towers have even more drive bays available. By popping out a plastic insert you reveal the empty drive bay behind it.
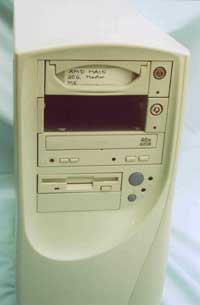
You need two or more front-accessible bays to hold the drive racks. Three bays allows for a CD-ROM
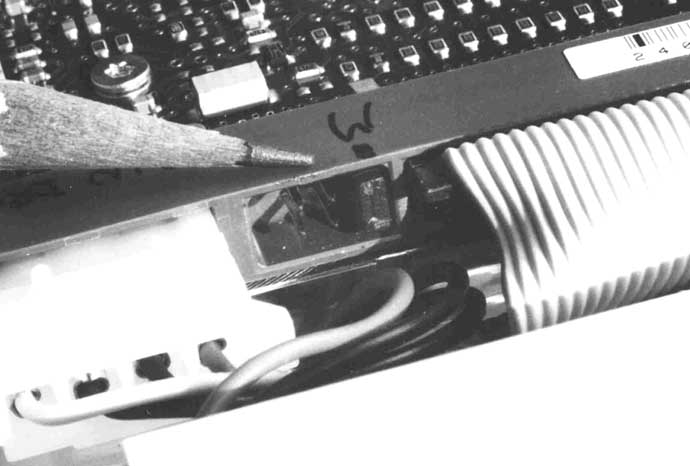
If you open your computer you will find your present hard drive mounted somewhere in there. You will notice two wire umbilicals going to it. The one with the four wires is the power cable. The other is a flat ribbon cable with forty or eighty wires in it ending in a forty pin plug. Note that there is a red stripe along one of the ribbon wires and it aims towards the power cable. You may notice that the power cable also has a red wire and that aims towards the ribbon cable. If your drive and computer support SATA, then a smaller cable and connector (than the ribbon) will be connected back there.
Before you continue, unplug your computer and ground yourself so that you don't carry a static charge.
Your computer should start up exactly as it did before, as if nothing had happened. You have simply mounted the drive a different way, but it's connected essentially the same. If the computer complains, doesn't start up, gives you a blank screen, or says "insert a bootable disk", then it's troubleshooting time. Shut down the computer, and slide out the drive, and reinsert it tightly, and lock the key switch. Try the system again; maybe there wasn't a good connection between the tray and the frame. If it still doesn't work, open everything up again and doublecheck your cables. Make sure they are inserted in the right direction and plugged in tightly. Try the system again. If it doesn't work, disconnect the cables, check to make sure you haven't bent any pins in the plugs, and begin reconnecting everything tightly. Try the system again. If the system still doesn't work, unplug and plug everything again; the plugs are where most problems occur.
The above process decribed how to replace a single hard drive with a single mobile rack. In most cases you really want to install two of these things. It changes the process only a little bit.
Before I go on I should describe the structure of your computer. Most modern computer motherboards have three drive sockets on them. One connects a ribbon cable to the floppy drive. The other two are probably labeled IDE-1 and IDE-2 and connect ribbon cables to the hard drives, CD-ROM and/or CD-RW drives.
IDE-1 is called the primary channel and IDE-2 is called the secondary. The primary can control two devices (such as two hard drives or two CD devices or a combination). Similarly the secondary can also control two drives, be they CD or hard drives. Thus you have a total of four items that can be controlled.
To distinguish the two items on the primary, one is called the master and the other is called the slave. Similarly on IDE2 one item is called the master and the other is slave. You will notice that the ribbon cable generally has three plugs on it, one to go into the motherboard, another to connect to the master, and the third to connect to a slave device if there is one. The same is true for the secondary ribbon connector.
Although it is not required, you generally want your primary master to be the hard drive that boots your computer and holds your operating system and main programs. It doesn't matter which socket on the ribbon cable you use for this drive, because the master/slave condition is determined by jumpers (tiny connectors) at the rear of the drive. The body of the drive usually has a label showing where these jumpers should be connected in order to make the drive a standalone master (there is no second hard drive), or a master with a slave (a second hard drive), or to turn the hard drive into a slave.
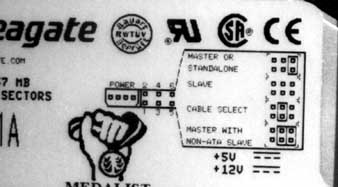 Drive
is usually labeled with jumper instructions
Drive
is usually labeled with jumper instructions
 Jumper
connects pins on hard drive, making it a master or a slave.
Jumper
connects pins on hard drive, making it a master or a slave.
If you only had one hard drive and it was already working in your computer, you wouldn't have to change the jumpers, they would already be set for master standalone.
For the moment, leave the second socket on the primary ribbon cable vacant.
The secondary ribbon cable should go to your CD-ROM drive (or CD-RW drive) and to the frame you installed for your second hard drive.
Your CD-ROM drive should have it's jumpers positioned for slave. Your second hard drive should have it's jumpers set for master (but not standalone master if that choice is offered).
If you have chosen to install a fourth drive (an additional hard drive or an additional CD-ROM or RW drive), you would mount the drive or drive frame into the computer case, and connect it to the remaining socket on the primary ribbon cable. Using the jumpers, set this drive to slave.
Computers generally come with several power supply plugs. It doesn't matter which one goes to which device.
Once all your hardware has been installed, start your computer to see what happens. If all goes right, the computer will automatically detect the new hard drives and will configure itself for them. Before it can be used, the new drive may have to be formatted.
If the system doesn't work, doublecheck all your cables, making sure they are tight, and triplecheck your jumpers, making sure they say slave or master as appropriate. If your computer complains about booting, partitions, FAT32, or viruses, it's most likely lying to you; the problem is with the cable connection or jumpers somewhere.
Sometimes it is neccessary to enter the BIOS (usually by hitting the delete key while the machine is booting) and working your way to the menus that control the hard drives. You want to switch your hard drives BIOS settings to autodetect so the computer will sense what kind of drive is connected to it, and configure itself appropriately. This way when you change to a different hard drive, or remove a backup drive, leaving an empty bay, the computer will figure out on it's own what you have done.
BACKING UP YOUR COMPUTER SYSTEM
The most useful feature to having removable hard drives is to be able to back up your entire system as an insurance policy against viruses and other foulups. To make a mirror image of your C: drive onto your D: drive you will need some special software. DriveImage made by Powerquest, the people that make Partition Magic, is one brand of drive cloning software. Another is Ghost made by Symantec. Personally, I use Data Lifeguard, distributed free from Western Digital.
I slip the drive-cloning software floppy into my A: drive or the CD into my CD-ROM drive and boot my computer. The software finds the two hard drives and gives me a menu for copying the entire C: drive to the D: drive. The process takes about 45 minutes for about 3 gigabytes. I then shut the computer down and remove the D: drive for safekeeping.
You can use the same process to duplicate your data drive. You might, for instance, remove your C: drive and replace it with a blank drive. Your D: drive has your video data on it. But running the drive cloning software you would copy the D: drive to your empty C: drive to back it up.
SOME TIPS AND TRICKS
It is not neccessary that your drives be the same size. You of course realize that you can't put six gigabytes of programs and data on to a four gigabyte drive, but you can clone the 40GB drive onto a 80GB drive. Personally, I try to keep my backup drives the same make and model as the original, just to avoid complications. One complication of using disparate drives would occur if you tried to pair up a 40GB drive with a 100 GB drive on a computer who's BIOS doesn't know how to handle large drives. There are solutions to this problem, but they add more steps to the process.
If you find yourself removing jumpers frequently, you will find that they are hard to remove with your fingernails or even with tweezers. What I do is drill a tiny hole in the jumper (if necessary) and run a loop of thread through the hole. This gives me a handle for pulling the jumper out easily.
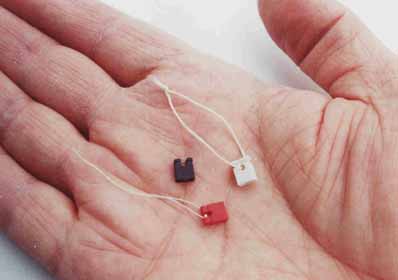 Threading
string through your jumpers makes them easier to remove
Threading
string through your jumpers makes them easier to remove
All the drive trays come with lids to cover and protect the drives. I generally remove the lids leaving the drive bare in the holder. This keeps the drive cooler and also allows me to reach the jumpers more easily.
I realize it is a scary process to open your computer and install new stuff. There are so many things that can go wrong, go wrong, go wrong... and unless you are an expert, you can spend hours trying to figure a way out of the mess. But once you have made this leap, your life will change. You will feel freer to experiment with your computer, adjusting the options on your software, and even installing questionable software. You won't need to fear viruses as much. You'll know that no matter how badly you bollix up your computer you can always yank out the drive and put in the backup drive. How much you loose depends on how often you make your backups. Similarly, you can back up your data drives so that if you badly bungle a video project, you can always return to where you were a day or two ago before you trashed everything. For the cost of a couple extra drives and some drive frames, this is pretty cheap insurance.