So you're one of those lucky people whose video hobby has turned into a small business. Inevitably, you are going to need to shoot a talking face, perhaps somebody at an office desk, or maybe shoot a small object under perfect lighting conditions, or maybe just record narration. Perhaps you want to do a fancy chromakey, replacing a blue background with canned footage of a space shuttle launch.
For projects like this, you could take over the kitchen for two days while your family streams through, tripping over mike and lamp wires, asking "are you done yet?" Your concentration and that of your talent (narrator or performer) will not be helped by distractions such as phones ringing, dogs barking, and refrigerators cycling on and off.
Then you may wonder why your resulting video has a green tinge (probably the lights bouncing off the green kitchen walls) and why your audio sounds like it was recorded in the shower (probably from the sound bouncing off those same walls). Also in the background you'll hear jets a-flying, horns a-tooting, kids a-screaming, neighbors a-yacking, and birds a-tweeting. Not a very classy production.
You could go rent a studio to produce these segments of your show. Professional studios charge a mere $1000+ per day, depending upon what you need. Of course you budgeted for this minor expense, didn't you? You might be able to rent a small school, college, or cable TV studio during its off hours for $200 to $500 a day, but that's still a lot of cash and there is always the hassle of getting there and getting them to open the place for you. If you have a spare million dollars or so, you could try building a professional studio in your backyard (local building codes permitting), but that's wayoverkill if you are using the place only once in a while. In fact the more any studio costs, the more hours per week it has to be in use before you merely break even.
This leaves us with the final option: building an inexpensive little TV studio in your garage, basement, attic, or henhouse. Nothing fancy, just a quiet place where you can control the lights and shoot without noise or distractions.
A cheapie sound booth -
Before we get into studio building, if all you need is a quiet place to record narration, then here's a tip from Elite Video's John Cooksey. Do your voiceover in a midsized or luxury automobile. Closing the windows seals out most of the exterior noise (parking the car in the garage provides even more insulation). Regarding interior echoes, the auto manufacturers have spent millions designing quiet car interiors. Most echoes are absorbed, and those sounds that hit the front and rear windows are reflected harmlessly downward. With a judiciously positioned omnidirectional microphone, you can capture the conversation of one to four people clearly. A single narrator could use the dashboard and/or glove compartment to hold his/her notes while a lavalier microphone picks up his/her sound. In a pinch you could even use the camcorder's microphone if you mounted the camcorder on a tripod in the car and positioned it close enough to you.
Finding the right spot -
If you want to convert a room into an inexpensive TV studio, your most important step is to select a problem-free space. An attic, for instance, might get too hot and cost a fortune to air condition. The basement might be under a heavily traveled kitchen or corridor requiring you to insulate against the sound of footsteps. The whir of an air conditioner, the roar of a furnace, the whine of a pump, or even the deedle-deedle of a nearby telephone or alarm can be very expensive to seal out. In short, you need to pick a quiet place with plenty of electricity and no unusual heating problems.
Some sounds can be controlled easily. Pumps, furnaces, air conditioners, and other motors can be turned off during the shoot and turned back on again afterwards. It is the "surprise" sounds of telephones, footsteps, barking dogs, and other people's air conditioners that will be harder for you to control.
Basements usually make good mini studios; their walls are generally concrete and soundproof --- outside the walls, nothing is as quiet as dirt. Your biggest sound infiltration will be from overhead or maybe from a nearby furnace, or crickets, or whatever else makes noise in your basement. The trouble with basements is that they generally have low ceilings, making it hard to hang lights.
Attics often have peaked roofs leaving plenty of space for lights, and footsteps from the floor below are seldom heard (or are easily hidden if you cover the attic floor with a thick carpet). Attics are susceptible to jet plane and outside vehicle noises, as well as rain, thunder, and the occasional weed whacker next door.
A garage often makes a great studio because it has a large open floor space (when the car isn't there) and often has a high ceiling (good for lights). If the garage is in the basement or in a separate building, noise infiltration may be low. Garage doors are notoriously loose, however, and may let in a lot of sound.
An enormous production space isn't necessary unless you're setting up a Ben Hur chariot race scene. You'd be surprised at how small most broadcast news and sitcom sets are. To the viewer, what is seen on the screen is all that matters; whatever is off screen by just a foot (i.e. garden tools, clothes racks, storage shelves stacked with paint cans) doesn't exist. A medium or close shot of a person with a neat background could have been shot at NBC Studios, for all your viewers know. A simple set, a wall mural, a bookshelf and a potted plant, or a chromakey blue curtain (with the blue replaced with a shot of the Taj Mehal), is all that is needed to suspend reality. Big studios aren't necessary.
Before I go any further, it is important to note that fire codes and other local ordinances may apply, restricting the homeowner's right to start CNN Central in his garage or basement. You'll have to check with your local authorities for this. Further, the use of several high wattage lighting instruments may overpower your electric system and cause a fire hazard. For purposes of this article, let's assume that you will be using fewer than three 600 watt lighting instruments or will be having a qualified electrician install extra wiring for your lights.
High ceilings -
Have you ever noticed that TV studios have high ceilings? You may have thought that this was to position the lights up high. This is only part of the reason. Yes, you do want the lights to angle down from 30° to 40°
above the talent. Any lower than this and your talent will begin to squint and your shadows will start to look strange. Also, you don't want your lights too close to your talent lest you fricassee their faces; some extra space is needed to keep the lights far enough back. The same is true for the all important, edge-creating, backlight. This light emanates from above and behind the talent and is very important for creating dimensionality. If the light isn't high enough and far enough back, it will shine into your camera lens causing a lens flare (glowing globs and patterns in the picture) or may even sneak into your shot.
The second and perhaps more important reason for having a high ceiling is that it leaves space for heat to go. Lamps get hot and heat rises. If you have a ceiling or any other combustible surface immediately above a lamp, you're likely to set it afire.
A third reason for a high ceiling, related to the second actually, has to do with comfort. A low ceiling traps the heat where you and your talent can feel it. A high ceiling allows the heat to rise up to where it isn't bothering anybody. Of course one could air condition the heck out of a room and keep up with the heat generated by the lights. This is a very expensive proposition. Even large professional studios don't attempt to remove the heat as fast as the lamps create it. Instead, the studio's air conditioners can handle about half the heat created by the lamps while the other half floats up into the high ceiling. After awhile, the room starts to feel warm, but by that time the shoot is over, the lights go out and the air conditioners have a chance to slowly catch up.
The more lights you use, the more versatile your lighting setups can be, but, the higher your ceiling needs to be to accommodate them. With today's supersensitive camcorders, you can probably get by with a mere 1,800 watts of incandescent light (600w key, 600w fill, and 600w backlight). If you are shooting more dramatic scenes or panel discussions with several people, you will need more lights and a fancier studio.
One last reason for having a high ceiling is that the hanging mechanism for the lights wastes some space. The lamp fixtures hang down from a yoke which is connected to a clamp which generally goes to a pipe which itself hangs from some kind of support. (In professional TV studios, these pipes are called the "lighting grid".) Even if the pipes are 4 inches from the ceiling, the typical hanging mechanism will place the fixtures nearly 18 inches from the ceiling, even more if the fixtures are large.
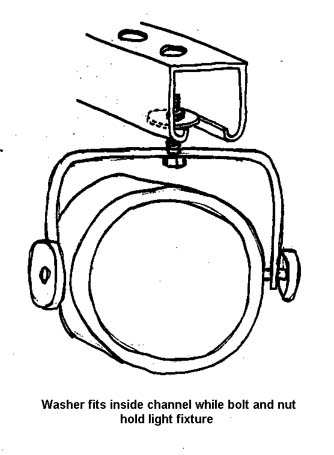
One way to save a few inches in this process is to use a steel rail called Kindorf. This "U" shaped metal beam can be attached to joists or a ceiling and takes up 1.5 inches of space. Instead of attaching your light to a professional C clamp as is normally done, you would run a bolt through the lighting yolk, pass it through the open groove of the strut, pass it through a washer inside the hollow of the channel, and then screw on a nut. This process minimizes the mounting hardware and raises your lighting instruments significantly. Just remain aware that you mustn't position the lighting instrument near a flammable surface. Also don't forget to tie a "safety" cable to the instrument so that if it comes loose, it doesn't become a scene from Phantom of the Opera.
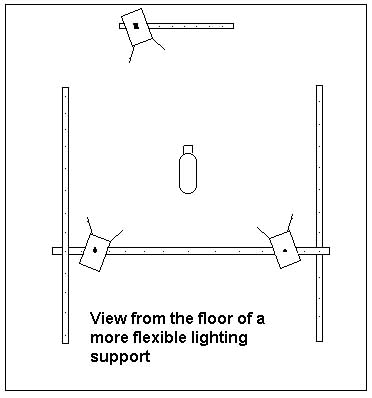
Normally the lighting pipe (your mini studio's "lighting grid") would run from left to right a few feet behind where the camera is positioned. For more flexibility, one could first install two Kindorf rails and then add this crosspiece in the shape of the letter H, allowing you to move the crosspiece closer or farther from the talent/stage, along with the lights that hang from the crosspiece. Another rail or pipe would be needed behind the talent to hold the backlight.
If your studio were very temporary, you might choose to bypass the lighting grid all together and just place your fixtures on temporary tripods like those sold in kits from Lowel Lighting (www.lowel.com), and Arri USA (www.arri.com).
Color temperature -
You may be tempted to use sunlight from an open window or the fluorescent lights already imbedded in the ceiling. Don't do it. The object of having a studio was to have control of your light, not just take what was there. Sunlight from a window cannot be aimed and the color and brightness of the light varies with the time of day. It could be a bluish 7000° K on a cloudy noon or be a reddish 2800° just before sunset. Fluorescent lights will have a greenish tinge to them and the light comes from too high an angle, creating deep eye sockets and poor shadows. Neither the sun nor fluorescent lights will mix well with your purchased halogen incandescent lights, which generally run at 3200° K. Under the worst circumstances you might have bluish light from the sun, greenish light from the overhead fluorescent lights, and reddish light from your studio lamps all painting your talent's face in Halloween colors.
Professional fluorescent lights to the rescue -
In the small studio, incandescent lights, even the professional tungsten halogen types, have three problems, they create a lot of heat, use a lot of electricity, and create harsh shadows. The small studio probably cannot handle a high electrical load, nor can its air conditioner rid the room of the heat. Because the lights are so close to the talent, the image tends to "bloom", causing white skin and white objects to appear too bright when in the direct beam of the light.
Professional fluorescent lights like those from Lowel, Balcar (balcar.com), Kino-flo (kinoflo.com), and Videssence, although relatively expensive (about $1000 per fixture) may be an excellent long term solution. The fluorescent lights use about 15% the power, create about 15% the heat, and make soft, appealing shadows. Special fluorescent tubes provide an even 3200° K color temperature. The fixtures can be aimed and the lamps dimmed. Because the color temperature is 3200° K, the light can be mixed with other incandescent lights so that you get the best of both worlds. You could, for instance, use one 300W fluorescent fixture for key light, a second for fill light, and a sharply focused 600W halogen lamp for a back light.
Sound control -
Unwanted sound comes from two places (not counting our spouses) --- outside the studio and inside the studio. Let's deal with the outside first.
There are two ways that unwanted sounds can sneak into your studio. One is through the air and the other is by vibrating the walls. Let's start with sound leaked through the air.
Sound will enter your studio if it can find holes in the wall, cracks around doors and windows, and spaces around pipes and ductwork. Somehow you need to seal the room tightly so that air cannot get in or escape. Of course you'll suffocate if you don't have some ventilation, but we'll deal with that in a moment.
Weatherstrip all the doors and windows. If you are not using a window, you may wish to cover it with plywood and seal it that way. Caulk any loose fitting walls or wall-to-ceiling joints and any places where pipes and wires enter the room. If a hole is too large to caulk, try stuffing fiberglass insulation into it.
Sliding glass doors and steel doors designed for exterior use are often weatherstripped and seal nicely. The same goes for exterior thermopane windows.
Now for the air conditioning. If you are using central air, there are two things you want to do. First, increase the size of the duct that enters the studio. This will slow down the speed of the air and reduce the "whooshing" sound of air as it exits the duct. A large grill over the duct will also help reduce the "whooshing" sound. Second, see if there is a way to have the duct take a turn so that any sound traveling along the duct (perhaps from the air conditioner's blowers) will have to turn a corner. Inside the duct at that corner, add some sound insulation material such as fiberglass duct liner. This way, when the sound tries to turn the corner, it will bounce off the sound-deadening material and never make it out the mouth of the duct. Ducts tend to vibrate, so you may wish to wrap them with sound-deadening material. Carpet or fiberglass roll insulation may work. If the duct remains behind a wall, it's vibration may not be a problem.
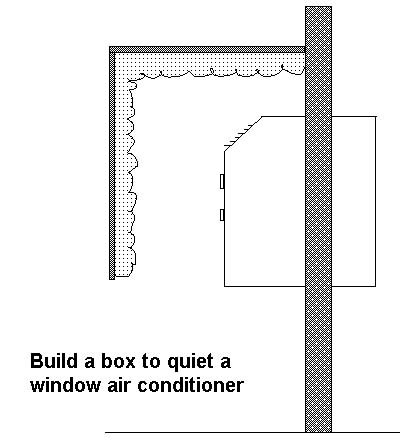
If you are using a window air conditioner, your problems are harder to solve. The air conditioner's fan and compressor are noisy and you have no control over the "whoosh" of the air. Your best solution here is to try to block the sound with something. You could, for instance, create a box that directs the air down to the floor while capturing much of the sound. Line the box with carpeting or other sound deadening material so that the noise stays in the box while the air comes out. The bigger and heavier the box, the better; ¾" plywood may work well. The deeper and fluffier the fiberglass insulation inside the box, the better. Even with this effort, the air conditioner may still be too loud and you may need to turn it off during the shoot (another reason for wanting a high ceiling to soak up some of the heat).
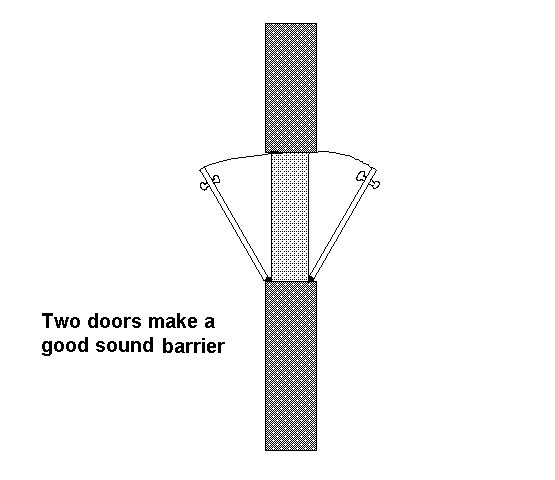
Next we deal with vibrating walls. Aircraft, automobile horns, neighbor's boom boxes, as well as footsteps on the floor above all penetrate your studio by vibrating the walls or ceiling. The solution here is to make the walls as dense and heavy as possible. If the walls are made of sheetrock, add a second layer of sheetrock over the first. Do the same to the ceiling. Incidentally, carpeting the floor upstairs will deaden footfalls as well as add mass to the floor, making it vibrate less. Sound that travels through windows and doors can be deadened by adding mass to the windows and doors. Extra panes of glass, storm windows, or a layer of plywood and wallboard will keep sound from entering through a vibrating window. Steel doors are more massive than wooden ones and do a nice job of deadening sound from that portal. You can add more mass to a door by gluing sheetrock or plywood to it. Another option is to install two doors, one opening in and the other opening out from the studio. This relatively inexpensive solution adds not only mass, but an air barrier that further reduces sound infiltration.
For the perfectionist, or if you live downwind of a Harley Davidson repair shop, a second wall is needed inside your studio. This wall is totally independent and not braced to the first existing wall. This second wall would be framed 4 inches from the existing wall, and would be covered with one or two layers of wallboard. This double wall construction may seem like a lot of work and expense, but is the only way to stop a sound that you cannot control any other way, such as a noisy neighbor or a loud machine on the other side of the wall.
Now that we've sealed out exterior sounds, let's deal with interior sounds. First we'll need to quiet any machinery we have inside the room. If the device cannot be turned off, then build a box around it so that the sound stays inside the box. For instance, you may need to use your computer during your production. If the fan is too noisy and you can't replace it with a quieter one, then build a half open box that you can place over your computer that keeps the sound from radiating directly to your microphones. You probably cannot build a closed box for your computer because it would overheat, however you can let the air circulate out the rear of the box and even though some sound may escape, it has to travel a long way around before it reaches your microphone. To improve on this plan a little further, you could face the open end of the box toward a wall that has sound insulation attached to it. This way the sound coming out of the box will hit the wall but won't bounce back into the room. Still, the best bet is to find a way to move the computer into another room, and keep the keyboard and monitor in the studio. The same applies to tape recorders and players; if you can keep them out of the room, fine, but if you cannot, build a box around them, or at least place a baffle or wall in front of them that will force the sound to take a long journey before it reaches your microphone.
Lastly, we deal with room reverberation. We want the least reverberation (echo) possible. We get echoes when sound strikes a hard surface and bounces directly back. We get worse echoes when sound strikes one surface, then strikes a parallel surface, and bounces back and forth between them several times. In this case the microphone will hear several echoes, and some of them may combine together to create a tubby or hollow sound.
The bigger the room, the fewer the echoes. If you have a choice of using a large room, half of which may simply be storage, then do it. All that extra air space of the storage room will work to your advantage.
If you can't afford a big room, then at least make the room asymmetrical. A cubic room (one with a square floor and square walls) has the worst echoes. An oblong room would be better. A slanted or peaked roof will go a long way to breaking up echoes. In fact, any non-parallel walls you can work into your design will help reduce echoes. If, for instance, you are building a double wall in your room, make one end of your wall 3 inches from the existing wall and the other end of the wall a foot from the existing wall. Crooked walls and ceilings break up echoes by bouncing them in random patterns. (If you have building skills like mine, crooked walls will be a snap to construct).
Next, cover the walls with sound absorbing materials. You could use fiberglass insulation held in place with chicken wire or you could carpet the walls, or even cover them with acoustical ceiling tiles. You could staple egg crates to the walls (remembering that flammable materials could create a fire hazard). Their non-flat surfaces chew up echoes like famished crocodiles. Carpet the floor and use acoustical tile in the ceiling. If your ceiling has bare joists, you don't have to install a dropped ceiling; you could simply glue ceiling tiles to every flat surface that faced the floor --- the joists themselves do a good job of breaking up echoes.
Covering the walls with heavy curtains will deaden echoes while providing a nice backdrop. If curtains seem too expensive, try finding a source of old, used curtains; nearly any heavy fabric will do.
The temporary studio -
Perhaps you cannot afford to dedicate a room to your television business; you just need a studio once in a while. It's possible to build a studio in an area that is used for other things, such as a workshop, a garage, office, or bedroom. Once you've figured out how to control the sound in the room and have found a way to hang lights in the right places, you can remove the lights and use the room for your other purpose until you need it as a studio. Find ways to make the room compatible between various uses. For instance, heavy curtains or acoustical wall treatment may seem inappropriate for an office, bedroom, or garage. Solution: put unobtrusive hooks in the corners of the room and, when you want to use it as a studio, run clothesline through the hooks. Next you could hang your curtain material or even clothing on clothes hangers from the line to act as your temporary acoustical treatment. No kidding, clothes on hangars works marvelously.
Creating a mini TV studio in your home may seem like a lot of work. But remember, you do not necessarily have to do the job exactly right. Anything you do will be an improvement over shooting in the kitchen. Just a little wall treatment and sound insulation will go a long way to taking amateur-sounding echoes out of your standup presentations. Adjusting your lights just a little more perfectly will add dimension and color and professionalism to your shots. And finally, having a door between you and your family may give you the privacy and quiet you need in order to concentrate on this creative endeavor we call television production.