
230
VCR,TV, and CAMCORDER CONNECTIONS:
TAMING THE WIRE JUNGLE
Some quiet evening, listen for tribal drums. If the sound
gets louder as you approach your video gear, it's a sign you've
created a wire jungle.
There was a day when video wiring was easy: the antenna
connected to the TV. One vine and you were done. Now, after
adding a VCR, TV, home entertainment center, another TV and VCR,
maybe editing equipment with processing amplifiers and
distribution amplifiers, you've created a tangle even Tarzan
can't penetrate. Well, put the machete away, there is a logical
way to link your gear together without opening a habitat for
chimpanzees. First, let's start with a few general rules.
Laws of the jungle -
* Draw a diagram. I know it sounds wimpy, especially if you
have only 3 or 4 pieces of equipment. Trust me, you'll
eventually add more, so you might as well get into the habit.
The pros do it, mostly because they don't like spending their
evenings troubleshooting wire connections. You don't have to be
an artist; just draw boxes and lines, labeling the inputs and
outputs. Besides, drawing helps you think clearly. Also, the
vines are straighter and simpler in your "paper jungle."
* Label your wires at both ends. Again, another technique of the
pros. After picking himself off the jungle floor, I'm sure
Tarzan started making notes, "This vine not connected,"
or "This
vine dumps you in the prickers."
* Use the best vines, er wires. S is best. Use these cables
whenever you can to connect VCRs, TVs, and special effects
devices. S-VHS and Hi8 VCRs and camcorders have these
connectors. So do the better TVs. These multiconductor wires
(also called Y/C cables) keep the colors separate from the
luminance (black and white brightness) in your picture, keeping
your image sharper with purer color.
Next best is separate audio and video cables. Audio would
travel over the familiar "patch cords" you use to connect
your CD
player to your hi fi. Video cables may look nearly the same and
have the same kind of connectors (RCA or phono) on the ends, but
they are not the same. Video cables are a little fatter,
stiffer, and have much better shielding than their less expensive
audio brothers. You can use video cables to carry audio signals,
and in a pinch, use audio cables to carry video, but if you want
sharp, smooth interference-free pictures, use only video cables
to carry video. They don't have to be gold plated, just designed
for the job.
The third best way to transport TV signals is via RF (radio
frequency) over a single coax cable. It's okay that RF comes
into your house from an antenna or the cable TV company. And
it's okay to distribute that signal directly to TVs and VCRs in
your house. But once your VCR has received the signal and tuned
in a particular channel (say channel 13), you don't want your
VCR
remodulating that signal (usually into channel 3) and sending
it
to your TV or another VCR to demodulate again. I know RF is
simpler and requires fewer wires, but all that demodulating
(tuning in a channel), remodulating (making another channel),
and
demodulating fuzzes up the picture. It works, but it's not the
greatest. Even Tarzan tried to limit the number of vines he
needed to catch when swinging from tree to tree.
Now let's explore some video hookups.
A - Simplest VCR hookup to a TV
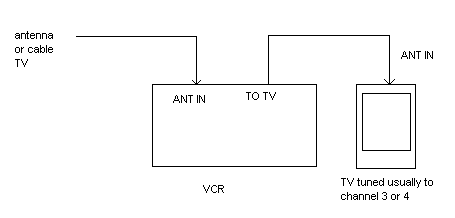
OK for casual viewing, but RF is a little fuzzy. TV tunes in all
channels when VCR not in use. When playing tape, tune TV to
channel 3 or 4.
B - Better hookup between VCR and TV
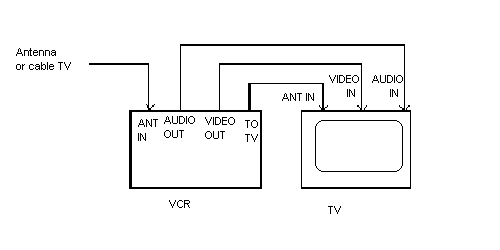
As before, TV can tune in any channel when VCR is idle. When
VCR
is playing, tune TV to AUX, or LINE, or VIDEO or maybe a special
channel number to have it "listen" to its audio and
video inputs
(not channel 3, although that would work, but not as well).
Note: Stereo audio involves connecting two wires (one for the
left channel, one for the right.) To keep these diagrams simple,
I'll only draw one wire for audio.
C - Best hookup between VCR and TV
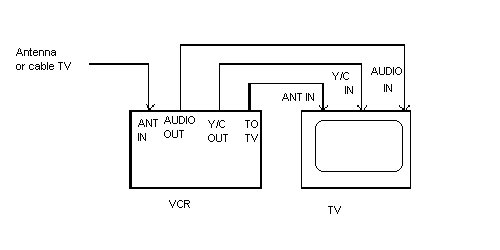
As in B, TV gets all channels when VCR
is idle. When playing
tapes, tune TV to "S" or "Y/C", or SUPER VIDEO,
or INPUT 2, or
whatever designation allows your TV (if so equipped) to "listen"
to the Y/C input. The TV still automatically listens to the
audio input. As in B, you could alternately tune your TV to
channel 3 to "listen" to the VCR. Try it. Can you see
any
difference between Y/C and channel 3? Look closely at the edges
of bright colors and also observe fine detail in pictures.
D - Camcorder/VCR/TV simple hookups
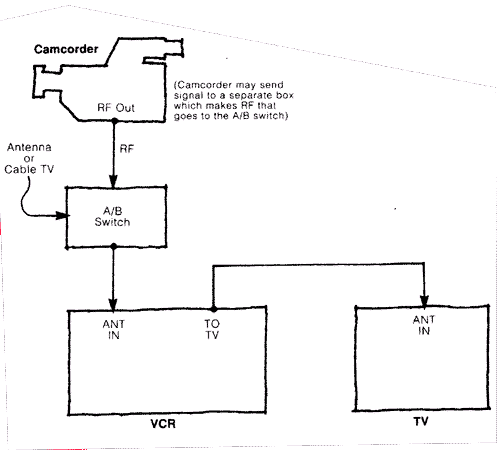
A/B switch (available at Radio Shack and
other electronics
stores) selects whether the VCR "sees" the antenna (or
cable TV)
or "sees" the camcorder output. When A/B switch is on
"ANTENNA",
the TV can view any channel if VCR is idle, and can view the tape
on channel 3 when VCR is playing. VCR can record any channel.
When switch is on "CAMCORDER", VCR and TV can receive
camcorder's output (as it records or plays). VCR can record
camcorder's picture and sound on channel 3, perhaps copying a
tape from the camcorder. The VCR could just as well be making
a
second "original" tape while the camcorder made a recording.
The
signal could be monitored on the TV.
This is one way to play tapes from an 8mm, Hi8, or VHS-C
camcorder into your TV for everyone to view, or make VHS copies
of the above tapes.
E - Another simple camcorder/VCR/TV hookup
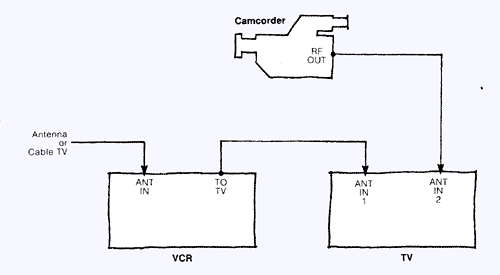
This method avoids the A/B switch and requires
a TV with 2
ANTENNA inputs. However you can't dub to the VCR.
Examples D and E used RF to transport the signals, not the
strongest vine in the jungle. It's better to use separate audio
and video cables or better yet, audio and Y/C. In the following
examples, we'll show setups using audio and video. Substitute
Y/C for video whenever you can.
F - Better Camcorder/VCR/TV hookup.
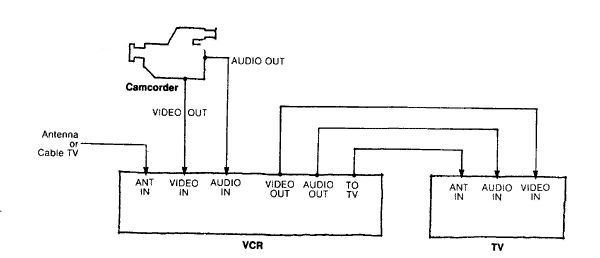
TV gets all channels when VCR is off. Switch
TV to AUX or VIDEO
(or whatever) when playing a tape in the VCR (although the signal
is also available on channel 3).
To play tape from the camcorder, the VCR must first
"listen" to its AUX or VIDEO inputs. Sometimes plugging
in the
cables automatically switches the VCR to those inputs; sometimes
you tune the VCR to an AUX channel (maybe channel zero). The
signal passes through the VCR to the TV, which must be tuned to
AUX to "listen" to the VCR.
The above plan allows you to monitor the camcorder as it
records or plays, and if you wish, copy the results on your VCR.
Some TVs have 2 AUX inputs, allowing you to connect two
VCRs or a camcorder and VCR directly to the set. This is a less
cumbersome hookup, but doesn't allow the VCR to duplicate the
camcorder's tapes.
If you have two VCRs, you can always substitute one VCR for
the camcorder in examples D, E, and F.
G - Multi TV/VCR/radio connections
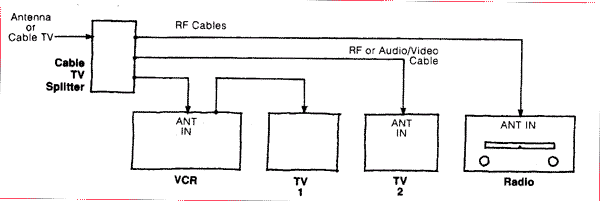
Many cable TV companies provide radio signals
along with TV. The
signals are usually strong enough to split up to three times (the
above is a 3-way splitter, but they come in 2- and 4-way
varieties) with minimal degradation. (For more splits, use an
amplified splitter to boost the signals as it divides them). For
cable TV, make sure the splitter is rated for up to 400 MHz,
higher if you get 41+ channels. Check with your cable TV company
whether they charge you for splitting the signal.
The above RF wiring can be used simultaneously with any
other of the examples.
H - Amplifier/VCR combinations
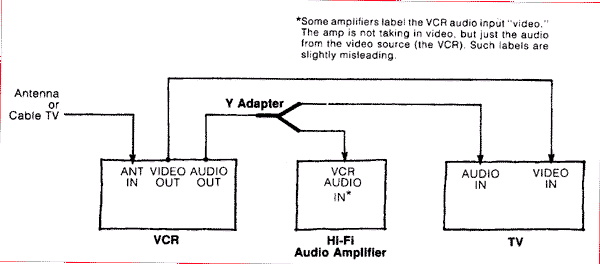
A Y adapter allows you to split the VCR's
audio signal (causing
minimal degradation), sending half to the TV and half to your
hi
fi amplifier or home entertainment system. Some hi fi's even
have an input labeled "video." Any input will work except
"phono" (may sound too bassy) and "mic" (input
too sensitive).
This way you can fill your living room with bone-jarring laser
blasts, or make Sprint's pin drop sound like barbells landing
on
an aircraft deck.
Hi fi audio recorded on videotape (ie. rental movies)
sounds especially good. Broadcast TV sound is rather mediocre,
and a hi fi VCR won't improve it any. Your hi fi's $200 speakers
will nevertheless sound better than your TV's $3 speakers.
Some VCRs have two audio outputs (actually 2 pair for
stereo) making the Y adapter unnecessary.
I - Complex, do everything VCR/hi fi/audiocassette/CD setup
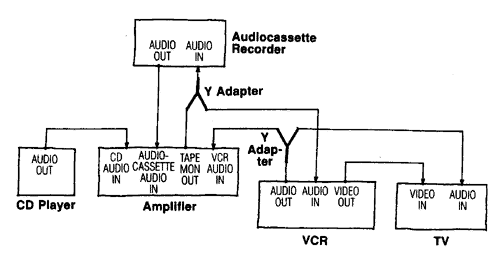
This setup requires a hi fi amplifier with
several inputs (most
have them) and a TAPE MONITOR output (most have these too). TAPE
MONITOR is an audio output that sends any selected signal to the
TAPE MONITOR output (not to the speakers yet); from there it
enters the audiocassette deck and gets recorded, and comes out
of
the audiocassette deck, back into the hi fi, and then to the
speakers. You hear what your deck records. Watch what you can
do with this feature:
1. Play a CD on your hi fi amplifier (Press
the CD input selector on the hi fi)
2. Play an audiocassette on your hi fi.
(Press TAPE MONITOR on your hi fi. Unpress
this button when using other inputs).
3. Play your VCR sound through your hi fi.
(Press VIDEO on your hi fi's input selector.
4. Record a CD on your audiocassette deck.
On the amplifier:
a) Select the CD input
b) Press TAPE MONITOR
c) Press RECORD/PLAY on the
audiocassette recorder
d) Adjust recording volume on your
audiocassette deck. Adjust
loudness- to-your-ears (as you
monitor sound) with the amplifier's
volume control. Note that you can
switch your audiocassette deck to
PLAY and hear the tape play without
any additional button-pressing.
5. Record CDs on your VCR. This is a
fantastic way to record 6 hours of music on a
$4 videocassette with excellent fidelity, if
you have a hi fi VCR. Hi fi VCRs rival CDs
in recorded sound quality. It's like having
a 12 CD changer.
On the amplifier:
a) Select the CD input
b) Switch your VCR to listen
to its AUX or AUDIO/VIDEO
inputs (no video is necessary
for this exercise).
c) Press RECORD/PLAY on your VCR.
d) Monitor your sound either:
1. With headphones connected
to your VCR, or
2. On your TV set (switched to
"listen" to your VCR)
6. Dub new sound tracks on your video tapes.
Here, your VCR must have an AUDIO DUB
feature. New sound will be recorded over
(erasing) the old sound track (Some two
channel editors allow you to record one track
leaving the other untouched). On hi fi VCRs,
the new sound doesn't touch the original hi
fi sound, but is recorded on the linear audio
tracks of your tape. You may have to press a
button on your VCR to listen to the
recordings made on your linear tracks.
The procedure is much like #5 above.
a) Select your sound source:
microphone, CD, phono, or
audiocassette deck (pressing TAPE
MONITOR to hear the deck.)
b) Switch your VCR to "listen" to its
AUX or AUDIO/VIDEO inputs.
c) Cue your videotape to where you want
to replace the sound.
d) Press AUDIO DUB/PAUSE on your VCR,
making it ready to record but not
moving yet.
e) Cue up your music or pretaped
narration or sound effects. As it
plays, check the sound quality and
volume. As the source plays, the
VCR's level meters should register.
Connecting headphones to the VCR
would permit more precise sound
monitoring. You could even monitor
the VCR's sound on your TV set,
tuning it to "listen" to your VCR.
f) Play the music, UNPAUSE the VCR.
g) Press STOP on the VCR when done, or
PAUSE if you wish to set up another
sound clip. Some VCRs employ an END
EDIT button that more gracefully
finishes the audio dub.
7. Quickly and efficiently record the songs
you like off the radio. If you have a hi fi
amplifier/receiver, try recording 6 hours of
music off the air while away (substitute the
FM input for CD in step "5a" above). Next,
come back and play the tape, skipping the
commercials and undesirable songs, and
copying the good ones onto another tape (ie
an audiocassette for your car). Around New
Year's many radio stations play the year's
top 100 songs, and you can easily skim
through them, (with fidelity as good as your
FM reception will allow) catching just your
favorites. The next example describes how to
transfer sound from your videotapes to
audiocassettes.
8. Copy sound from videotapes onto
audiocassettes. Note: You must use a hi
fi-capable VCR. Non-hi fi models (or hi fi
models in their NORMAL or LINEAR audio modes)
will yield poor sound.
a) On you hi fi amplifier, select the
VIDEO or VCR input
b) Press the hi fi's TAPE MONITOR
c) On the VCR, press PLAY. Make sure
your hi fi VCR is playing its hi fi
soundtrack (not its LINEAR, lo fi
track).
d) On the audiocassette deck, press
RECORD/PLAY.
e) Monitor your sound with the
amplifier's volume control
f) Use PAUSE on your audiocassette
deck to bypass unwanted songs or
commercials.
g) With your audio deck in PAUSE, fast
scan your VCR through unwanted
material. Watching your VCRs tape
time counter (perhaps viewed on
your TV screen, if displayed there)
can help you fast scan through
unwanted songs, many of which last
three minutes. Once you build a
rhythm, you can anticipate where
the next song begins.
The above techniques are great for:
a) Skimming through radio music
b) Copying a favorite song off a
rental video tape
c) Catching the sound track from an
off-air show.
d) Copying the sound track from one of
your home video recordings
Digital video-
So far, we've discussed analog video
techniques. Working with
digital video involves connecting digital IEEE 1394 connectors
or USB2.0
connectors between your equipment. The digital connection can
carry the signals in both directions so each port is an
input/output. Audio is usually carried along with the video. Even
the
connections to a digital TV can be digital, often HDMI. The
advantage of using digital signals is that there is
no generational degradation. A copy looks as good as an original.
The disadvantage is sometimes compatibility issues with the signals.
Both sender and receiver of the data have to be using the same
set of
standards for the data, codecs, compression, etc.
The examples shown can be combined for super-complex
connections of VCRs, camcorders, home entertainment centers, and
TVs. In many situations you can substitute a camcorder for the
VCR in the diagram. The neat thing about the more complex setups
is that they do so much without additional disconecting and
rerouting of wires. The less you have to monkey around in the
jungle, the less your vines get tangled.
The keys to success are:
1. Draw the plan first.
2. Label your wires
The key to failure is: swinging through the jungle on
poison ivy vines.
| About the author | About Today's Video 4th. ed. | Return home |