208
Gerald F. Lieberman (I don't know who he
is either) is quoted as saying, "Television is proof that
sight has a definite odor." If your pictures stink, then
maybe you are not setting up your camera(s) or camcorders properly
before use.
Camera adjustments come in two steps:
1. Setting up the first camera right
2. Making the other cameras match it
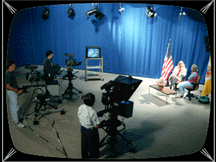
Setting up the first camera -
These are the steps you will take when shooting with a single
camera, EFP (Electronic Field Production) or ENG (Electronic News
Gathering) style. If adjusted correctly, your camera will match
shots taken by the same camera on other days as well as shots
taken by other cameras. In theory, that is. In practice, nothing
ever matches perfectly, which leads to a lot of tweaking and color
correcting during the edit. Still, the best anyone can do with
a single camera is to adjust it for optimum operation and hope
Murphy doesn't find you in violation of one of his Laws.
Step 1 - Normalize you switches -
Before adjusting your camera, make sure the switches are in the
proper places. A free-running camera should be on INTERNAL SYNC,
with its GAIN set to 0 dB. BARS should be off, and the power should
be switched to AC or battery, whichever is appropriate, and I'm
sure you already know how your picture smells when your batteries
are dead. (Incidentally, have you ever wondered why dead batteries
don't attract flies?) Switch your camera's AUTO GAIN and AUTO
IRIS ON. Make sure the the camera lens macro is switched OFF and
no lens extenders or attachments are in place (except for a clear
glass or ultraviolet filter). Switch SHUTTER SPEED to NORM.
Step 2 - Set the COLOR TEMPERATURE filter
for the appropriate lighting -
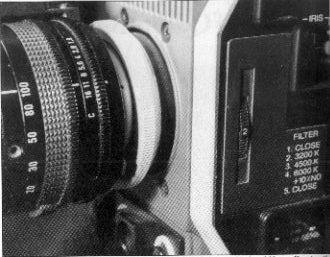
Most cameras have an internal color temperature wheel with several
colored filters allowing the camera to adjust for:
a. 3200° K for shooting scenes under studio lamps or outside
during a sunrise or sunset --- all "warm" light conditions.
b. 4500° K for fluorescent lamp lighting (greenish).
c. 6000° K For bright or hazy sunshine
d. 8000° K For shooting outdoors in cloudy or rainy weather
or with a clear blue sky without direct sunshine.
Some prosumer cameras merely have a switch marked INDOOR/OUTDOOR or with a picture of a lightbulb and sunshine.
Step 3 - Adjust WHITE BALANCE -
Every time you power up your camera or change lighting conditions
(like moving from indoors to outdoors or even from scene to scene
sometimes) you have to "teach" the camera what color
white is.
In the area you plan to shoot (and its light), place a white card
in front of the color camera close enough to fill the camera's
VIEWFINDER screen. If you don't have a white card, then aim the
camera close-up at someone's white tee shirt. Try to find someone
who has had a birthday recently; yellowed tee shirts will lean
your colors towards blue.
Some cameras come equipped with a milky white camera lens cap
which you can place over the lens and use as your white surface
while aiming your camera at the lit set.
Press your camera's AUTO WHITE BALANCE button and hold it for
the required amount of time (probably three seconds).
Step 4 - Set the AUTOMATIC BLACK BALANCE
-
No, BLACK BALANCE has nothing to do with jury selection in Los
Angeles. Just as cameras have to be told what color white is,
they have to be told what black is. On most cameras, you simply
press the button and hold it for the required three seconds or
so and you are done.
You are now ready for "action." Start your VCR and switch
the camera to BARS, feeding ten seconds (SMPTE recommends 1 minute)
of color bars to the tape. If your camera's encoder is a little
off (something that is difficult to adjust in the field), the
out-of-standard color bars will highlight the problem, making
it easier to color correct this tape during editing.
If you're a real perfectionist, switch off the camera's BARS,
uncap the lens, and aim it at a chip chart (a test chart with
a scale of gray "chips" or color bars) illuminated by
the light on the set, and record this for 10 seconds. This test
takes camera optics and other factors into consideration. The
resulting video sample can later be compared with standardized
test signals, allowing adjustments to be made in post. DSC Laboratories
in Ontario, in combination with the Canadian Broadcasting Corp.
has developed a neat combination color bar and gray scale test
chart slide, (called the COMBI-1) held in a portable light box
illuminated by the light on the set. Aiming the camera at the
slide and recording the results provides a precise reference signal
useful when making color corrections later.
At last, call out your slate and let her roll. (What do you mean,
everybody got bored and went home?)
DSP (Digital Signal Processing) cameras have a memory that can store all the settings you have made to your camera. Record these settings now. Next time you use the camera, you can go through a setup menu and select this setting and with one keystroke, reset the camera to the settings you stored. Each day you come back to use your camera, it will operate as if you had never put it down.
Misadjusting the camera on purpose -
Sometimes television is art, sometimes truth, and sometimes it
takes some art to create the appearance of truth. The properly
adjusted camera viewing a properly lit scene, should create true-to-life
realistic pictures. In theory, that is. The real world doesn't
come properly lit and the cameraperson has to cheat in all sorts
of ways to make the real world register within the limits of his
machinery.
If it's too dark, you may have to boost the camera's GAIN to add
contrast to the picture. You will also add graininess and to the
picture and your color will be muddy. If the scene is very bright,
the camera can usually handle it by automatically closing the
iris. Sometimes the scene is still too bright or the videographer
doesn't want to shoot with the almost infinite depth-of-field
found at f22. The solution here is to attach one or more neutral
density filters to darken the scene or increase the camera's electronic
shutter speed. The former solution yields a more natural effect
than the latter.
Excessive backlight occurs when someone stands in a doorway or
window and the camera adjusts its iris to make beautiful pictures
of trees and clouds with a silhouette of your talent in the foreground.
If your performer is important, then hit the BACKLIGHT switch
or manually open your iris a stop or two so that the background
gets overexposed and your performer exposes himself just fine.
Hitting the performer with a little key light (just the light
beam, not the fixture) may help too. Remember that outdoor light
may be 6,000 to 8,000 degrees in color temperature while your
camera light or portable light is probably 3200°K and will
need the help of a blue filter to match the blueness of the outdoor
light.
If you expect to be panning your camera across scenes with bright
windows or dark alleys, you may wish to switch your AUTO IRIS
to MANUAL and adjust it for your beginning and end scenes. This
way, the whole image won't darken and brighten in autoadjustment
as you pan. A typical faux pas occurs where you pan from one couple
across an open doorway to another. As the camera grabs a bit of
the door's daylight, the rest of your image turns into shadows
and silhouettes and will stay that way until the door is totally
out of the picture.
Afro-American brides with white veils and wedding dresses do the
same thing to a camera; it adjusts for the white of the gown while
sacrificing the face. Again, switch to manual iris and crank it
open until the face looks good. Conversely, when shooting an auditorium
scene where a spotlight illuminates a performer and the rest of
the stage is dark, AUTO IRIS may yield a white blob moving around
on a dark stage. Again, switch the iris to manual, and this time,
stop it down to higher f numbers, darkening the stage completely
while perfectly portraying the performer.
And then there is painting with the camera. With the use of filters
and misadjustments, you can create an environment that never existed,
an image that is half real and half manufactured. Various colored
filters can add warmth (coral, yellow, pink), coolness (blue),
soft and misty (low contrast and haze filters), blue-sky-with-puffy
clouds (polarizing filter), and hazy, sunset, or dark skies (graduated
filter).
If you don't happen to have a colored filter handy, you can still
"fake it" by white balancing your camera on a nonwhite
surface of the opposite color. For instance, to create a warm
reddish candlelight or sunset glow to your image, white balance
on a pastel turquoise shirt or through part of an aqua gel at
a white sheet. Conversely, to create a cold or nighttime effect,
white balance on that yellowed tee shirt.
Recent TV cameras have dial up menus that appear in the viewfinders
allowing you to strobe through various options, raising or lowering
the camera's pedestal (brightness control), gain (contrast), or
boosting or reducing any of the camera's three primary colors
or combinations of colors. Indeed you can "paint" with
the camera. Just don't expect to match the shot with anything
afterwards; it's hard to reproduce something totally out of standard.
The above isn't completely true. Digitally controlled (DSP) cameras
allow you to "paint by numbers," setting every parameter
of the camera digitally and then storing the data in memory. Later,
when you want to recall the same settings, no matter how whacky,
just recall the memory setting and the camera will pick up where
it left off. This is a very handy feature when a camera is used
for several different jobs at once, each job requiring a special
"tweak" to satisfy the whims or artistry of particular
clients. After spending hours softening the picture to hide wrinkles,
adjusting colors to enhance the look of foods, it is nice to push
a button, store the effort, then shut down for lunch or go home
knowing that the push of a button will recall the settings without
further ado.
Similar to the camera with digital controls is the PC-based time
base corrector (TBC) with digital proc amp and colorizer controls
with memories. Say you've shot a tape in the field (maybe it forgot
to duck when you took aim) and when you played it back, the talent
didn't appear bright enough or was off color (and you weren't
shooting Andrew Dice Clay), you could run the signal through your
TBC, and make brightness and color corrections, storing the adjustment
settings in memory. After editing that scene, you may edit other
scenes from other tapes using other proc amp settings. When you
come back to another shot from this errant tape, you would call
up the memorized setting and it would correct the color etc. in
one stroke. Some nonlinear editors (NLEs) also have this feature.
Elite Video (www.elitevideo.com 800-468-1996) sells the $650 BVP-4
Video Processor that does most of these tasks.
So much for EFP (Electronic Far-afield Production). Elsewhere
on this website we'll address the art of matching studio TV cameras,
in theory and in practice. There are many people nowadays that
are monitoring their homes with security
video cameras, and these use pretty basic settings since the
appearance is not as important.
*****************************
BOX 1 - DSP - Digital Signal Processing Remember the debates we
used to have about which were better, chips or tubes? Chips won,
and for probably the same reasons, DSP is taking over camera technology.
Digital Signal Processing involves converting a camera's image
signal into ones-and-zeroes, then manipulating those digits to
modify or improve the image, then converting the binary stream
back into an analog TV signal. Meanwhile, camera setup parameters
can be set without knobtwiddling or screwdrivers, and then digitally
stored, for later recall. Advantages of DSP:
1. Permits excellent picture quality.
2. Setup is relatively easy, quick, and requires less test gear
(generators, charts).
3. Control is consistent and drift free.
4. Fewer moving and organic components improves reliability. Digital
circuit components degrade less than organic (ie capacitors, potentiometers,
and coils) parts over time.
5. Fewer organic parts results in a smaller, lighter, more power
stingy package.
6. Controls can be centralized (not necessarily on the camera
or "all over" the camera.
7. Settings can be memorized and accurately recalled.
8. Digital components are less affected by shock, temperature,
humidity, pollution, and vibration than their analog counterparts.
9. Matched cameras can be maintained with little technical help.
10. Chroma detail is improved, along with better transitions between
colors.
11. Digital mathematical algorithms in the camera permit special
setups, such as dark detail enhancement, which would take a lot
of analog knobtwiddling to invoke or turn off. 12. More digital
algorithms suppress cross-color interference (where fine details
create false colors).
If you are debating over whether to buy
a used non-DSP camera and a new DSP model, perhaps some of the
above advantages will sway you over to spending the extra bucks
on a DSP model.
| About the author | About Today's Video 4th. ed. | Return home |