249
LIGHTING IN A NUTSHELL
Lighting in a nutshell: first you get these itsy
bitsy lighting
instruments and place them ... Seriously, lighting
a nutshell follows
the same rules as lighting an elephant. Those
rules are:
1. Get enough light on the scene so that your
camera can "see".
2. Position your lights to create shadows which
will, in turn, create
the illusion of depth and texture on a smooth
flat TV screen.
3. Maintain consistent color temperature unless
you are using color
for dramatic effect.
Enough light -
The most recent color TV cameras can produce a remarkably good
image in just a couple footcandles of light, the
amount you might find
in a typical living room. This does not mean,
however, that the
camera makes a good picture at that low level.
When the camera chips
are gasping for photons, the amplifier circuits
crank way up to yield
a picture that is grainy and has poor color rendition.
It's a lot
like turning up the volume on your radio to hear
a distant station;
you increase hiss, noise, and interference from
other stations. Most
TV cameras today, even if they are rated for 1.5
lux minimum
sensitivity, require nearly 120 lux, to generate
a clean, clear,
normally amplified (the +18 dB boost circuits
are not engaged)
picture. Even at 120 lux, the camera lens has
to be open all the way
(around f/2) yielding a diminished depth-of-field
and perhaps fuzzy
corners in the picture due to lens aberrations.
Most TV cameras today
are rated at 2000 lux with the lenses set at f/8
yielding excellent
depth-of-field. Two thousand lux is the brightness
you find in a TV
studio or outdoors on a lightly cloudy day. How
we acquire that 2000
lux is the subject of this article.
If you are racing around with an ENG camera, your
only hope is
to place your subject under some existing light
and maybe enhance the
brightness a little with the onboard camera light.
It is surprising
how much brightness you get from a 25 watt onboard
light when your
illuminating a newsperson only 5 feet away. This
type of light isn't
beautiful, but at least it makes a picture.
Blinded by the light -
Normally you want light to be behind you (the camera), not
shining into the camera lens from behind the subject.
Perhaps you've
already seen what happens when your camera follows
a person walking
indoors across an open door or window flooded
with daylight.
Everything in the scene goes dark (except what's outdoors) leaving
your subject in silhouette. Possible solutions:
Lock your camera's
auto gain and auto iris circuits on manual so
that the window gets
overexposed while your interior shot remains unchanged.
This still
doesn't make a pretty shot. Covering the window
glass with a neutral
density gel (a sheet of tinted plastic-like material)
may help, but
the technique doesn't work on open doors, and
requires you to carry
around huge rolls of gel material. Another solution
is to pour lots
of interior light onto the subject, equal in brightness
and color
temperature to the outdoor light.
You'll come across dozens of situations where
a desk lamp in a
scene silhouettes your performer, or too much
sky in an outdoor shot
darkens the desert roadway, or your performer
is forced to stand with
the sun to his/her back (ie. the talent is standing
at the edge of a
canyon and the only way to have the canyon as
a backdrop is to shoot
into the sun.)
No problem --- In the case of the desk lamp, just
insert a low
wattage bulb to tone down the brightness. Gel
the bulb to the right
color temperature (explained later) if necessary.
If the sky is too
bright in your outdoor scene, either tilt your
camera down to reduce
the percentage of sky in the shot, or employ a
graduated filter on
your lens to darken the top part of the picture.
As for the sun to
your talent's back, set up a few reflectors to
bounce the light into
the talent's face. Now the sunlight becomes a
back light (explained
shortly) adding dimension to the scene. This shot,
in fact, is often
preferred over the sun-in-the-face shot because
the uncontrolled sun
tends to make the talent squint; the more controlled
reflected light
can be positioned to yield desired shadows without
the squints.
Me and my shadow -
If you've just arrived from Mars, you've probably noticed that
TV screens are nearly flat. Engaging imagery is
three dimensional.
Somehow you have to create the illusion of texture and dimension
in
your picture to keep it interesting. You do this
with light and
shadow. The basic rules of 3- and 4-point lighting
haven't changed
since Daguerre slipped the first light sensitive
copper plate into a
camera in 1839. Here they are:
If you have only one light (1-point lighting),
place it to one
side and above the camera aiming at the subject.
If the light is too
close to the camera, your subject will appear
featureless (no
shadows). If the light gets too low, the subject
will look spooky or
ominous. Campfires and candlelight are the only
illumination that
normally come from below. We are accustomed to
light coming from
above, from ceilings and the sun. Light from above
and to the side of
the camera will create a shadow under the chin
and along one side of a
face, giving it dimension.
One light alone does not do a great job. It
is often so harsh
that it creates super black shadows which exceed
the contrast
capability of the camera. You may diminish these
shadows by bouncing
your light off a white surface such as a wall
or ceiling behind and
above you, or by using a light with a large reflector,
or one covered
with specular (dimpled) glass, or with a fine
screen called a scrim,
or a white fiberglass sheet. All of these will
weaken the light and
soften the shadows. On faces, soft shadows are
more flattering than
hard shadows.
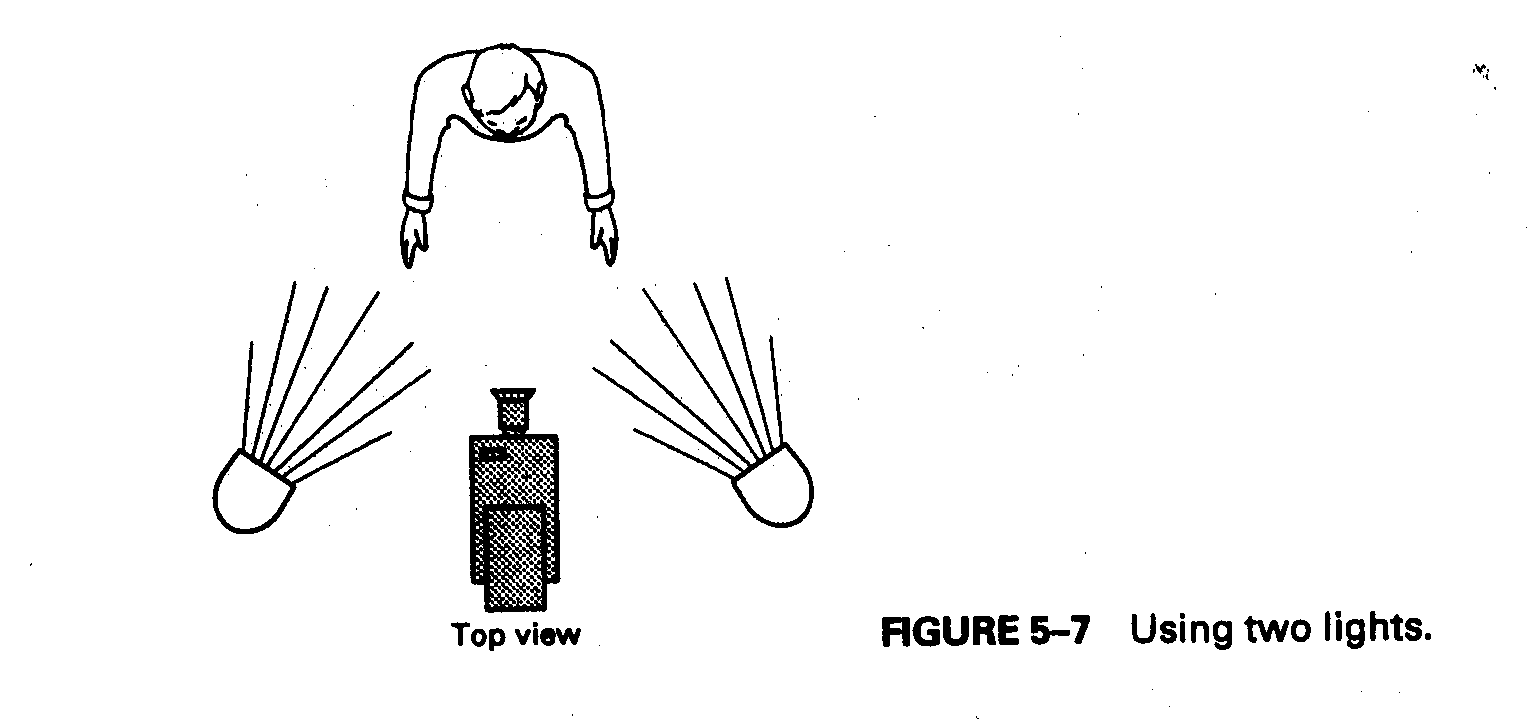
Two-point lighting adds much more flexibility
and I feel it is
the minimum number of lights that you need to
do a creditable lighting
job. The first light, called the key light, creates
the basic
illumination for the scene; you might think of
it as the sun. Place
the lamp to one side of the camera and above it.
How far you place
the light from the camera is a matter of taste.
The farther you move
the light from the camera, the more pronounced
the shadows will be,
making your subject more dimensional, but you
don't want to overdo it.
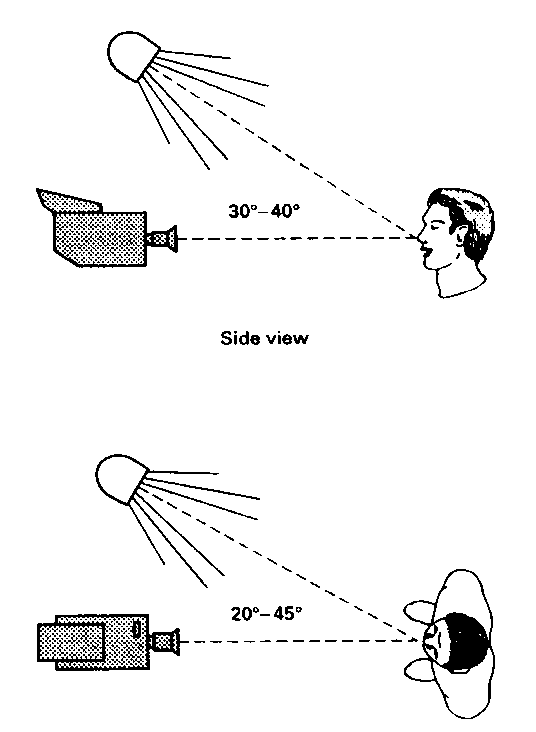
You might place the lamp at an angle of 20 degrees to 45 degrees
to
one side and 30 degrees to 45 degrees above the
subject. (When
working with a single light, you keep it closer
to the camera to
downplay the shadows. When you have two lights,
the second light
takes over the job of downplaying the shadows.)
A naked key light may
be too harsh for video portraiture: every zit
and wrinkle will show.
Soften it with a scrim.
The second light, the fill light fills in the
shadows you just
made. This light is generally placed 20 degrees
to 45 degrees to the
side and 30 degrees to 45 degrees above the camera-to-subject-axis
just like the key light but on the opposite side
of the camera from
the key light. The fill light is generally softer,
not making strong
shadows of its own, but mitigating the shadows
made by the key light.
The fill light generally has a larger reflector and scrim to weaken
the light and soften its effect. The fill light
shouldn't be as
strong as the key light; you don't want to erase
the shadows, just
diminish them to the point where they add subtle
dimensionality. The
fill light may be half the wattage of the key
light or be placed
farther from the subject, weakening the light,
or be gelled or
scrimmed to weaken the light. The fill light may
often be dimmed up
to 20% without ruining your color temperature
(a subject we'll discuss
later).
Three-point lighting adds a third light, a back or modeling
light that sets the subject off from its background.
The backlight,
which is a hard, focused light, positioned 45
degrees to 75 degrees
up from horizontal behind the subject, places
a rim of brightness
around heads and shoulders. Position the light
far enough out of the
scene so that it doesn't shine into your camera
lens. Make the light
bright enough to do the job without being obvious.
Even the experts don't trust their eyes when
lighting, and view
the camera's image through a TV monitor when adjusting
the brightness
of the lights. Although the process can be done
with light meters and
calculations, it is quick and easy to observe
the TV screen and use
common sense and your innate aesthetic prowess
when adjusting lights.
Be careful not to aim the light directly down
on your talent.
This would create a halo across the top of a person's head and
illuminate their nose. As the person's head moved,
their nose would
dip into and out of the light blinking on and
off like Rudolph, the
White-Nosed Reindeer.
Three-point lighting will get you through most
situations. Most
small studios and office shots don't have room
for a backdrop to be
placed far from the talent. This means the background
gets
illuminated by the spillage from the key and fill
lights, and you
cannot do much about it. In larger areas, the
backdrop or set may be
far enough from the talent to become dark. It
is appropriate for the
background to be darker than the foreground; after
all, you want the
foreground to be the center of attention. If the
background becomes
too dark, you need to add a fourth light (thus
the term 4-point
lighting) which is called the set light. This
fixture can be
positioned overhead or near the floor or anywhere
out of sight of the
camera, aimed at the set. If the set is small,
nearly any light will
do the job. If the background is a tall curtain
that must be
illuminated evenly, special fixtures with semi-parabolic
reflectors
are used. When aimed towards the set from above,
the fixture will
beam most of its light towards the bottom of the
set which is farther
away, and beam a smaller amount of light at the
top of the set which
is nearby. This keeps the nearby part of the set
from becoming overly
bright.
Color temperature -
Lights come in different colors as we all know, but white light
can have subtle color differences that are not
obvious to the naked
eye. This explains why we can buy a blue suit
in a store and wear it
outside only to find it's sort of brown. The store
lights make the
colors look different than the outdoor light.
The amount of redness
or blueness found in white light is called color
temperature and is
measured in degrees Kelvin. A Kelvin degree is
about 273 degrees
higher than the same temperature measured on the
centigrade scale.
Physicists derive color temperature by heating a very black object
hotter and hotter. As the temperature rises, the
color changes. At
first the object would glow red at 500 degrees
K, then orange at 2000
degrees and white hot at 3500 degrees K. Applying
more heat in Tim
Taylor fashion, the body would glow bluish-white
at 6000 degrees
through 10,000 degrees. Above 10,000 degrees,
the color gets no
bluer. Probably the instrument melts at that point
setting off smoke
detectors all over the physics laboratory.
Thanks to physicist Max Planck, who first described
this
phenomenon and the patience of his local fire
department, the subtle
coloration of white light can be described by
its color temperature.
Incandescent light in a home, as well as outdoor light in the
early
morning or around sunset, is about 2000 degrees
K. Early or late
daylight or the light from professional quartz
studio bulbs is about
3200 degrees K, slightly less red than home light
bulbs. Mid-day
light is about 5500 degrees K as is HMI (Halogen
Metal Iodide) lights.
This light is bluer and looks "colder" than 3200 degrees
K studio
lights. Daylight on a hazy or foggy day could
be as high as 7000
degrees K. Fluorescent lamps may be around 3500
degrees to 6000
degrees K but have strong amounts of green and
may be missing other
colors entirely making them hard to describe on
the color temperature
scale. Professional fluorescent lamps are made
which approximate a
3200 degree color temperature.
When setting up your camera you can adjust your
color
temperature filters and white balance the camera
for tungsten,
halogen, fluorescent, or outdoor light and get
a good image. A
problem arises when you have two different colored
lights in the same
scene. If, for instance, you illuminated a face
with a fluorescent
light on one side and incandescent light from
the other, the
fluorescent cheek will look greenish-blue and
the incandescent cheek
would look reddish. By adjusting your camera you
could make one side
of the face look fine, but the other side would
be ready for
trick-or-treat.
Dimming an incandescent light cools it and makes
it redder (just
like the physics experiment). You may get away
with 10 to 20% dimming
before the color shift becomes noticeable, but
beyond that you create
a color temperature problem, especially if the
light coming from the
opposite side of someone's face is running undimmed
(the full 3200
degrees K). If you have to dim, say, your fill
light more than 20%,
it may be time to relamp the fill fixture with
a lower wattage bulb or
add a scrim or neutral density gel, then run the
lamp undimmed.
The color temperature of light can be changed
by placing a
colored filter, called a gel (short for gelatin,
from which it is
made) into the lighting fixture. Say you were
shooting outdoors in
5500° K sunlight and were trying to fill in shadows on a
face. If you
aimed your trusty portable quartz light at the
shadowy side of the
face, that cheek would appear reddish. The problem
can be solved by
placing a blue filter in front of the quartz light
changing its color
temperature to 5500 degrees K. Rosco, Lee, and
Gamcolor make color
correction gels, and offer instructive booklets
and sample swatches.
Rosco (800-ROSCONY), for instance, sells a color correction series
called Cinegel.
Blue filters seriously reduce the amount of light
that comes
from a lamp, sometimes making it necessary to
use more lights and more
power. Once solution to this problem is to avoid
electric lamps
altogether and using a simple reflector, bounce
the existing sunlight
onto the dark side of the face. A white sheet
or a white foamcore
board would bounce a soft reflected light. The
light may be so soft
that the reflector will need to be near the subject.
Placing wrinkled
tin foil over the foamcore multiplies its reflectivity,
allowing the
reflector to be used from farther away from the
talent. The foil
reflector, however, would make a very focused
beam that may be a
little hard on your talent's eyes. For a more
professional strategy,
$80-$150 will buy a Flex Fill Reflector from Westcott
(419-243-7311).
Fabric, white on one side, gold or silver on the other, is stretched
over a wire hoop to form the reflector. With a
twist, the hoop
collapses into an easier-to-transport figure eight.
A third solution to the above dilemma: HMI lights.
HMI lights
are color balanced to 5400 degrees K and are perfect
companions for
sunlight. Since they do not need filters to achieve
the 5500 degree
temperature, all of the light gets used, wasting
none going through
filters, and wasting no electric power.
A fourth solution is to use professional fluorescent
lights.
They come in banks of 2-6 and their bulbs are manufactured
to produce a certain color temperature. Most are dimmable,
usually from 60% to 150% without changing color temperature.
The fixtures are more expensive than their tungsten brothers
but they use about 1/4 the electric power that incandescent lights
do.
Kinds of lights -
TV studios typically use tungsten halogen lamps in big clumsy
fixtures with clamps to hang them from the ceiling
grid. Key lights
are usually focusible which means the bulb can
be moved closer or
farther from the reflector or a front lens spreading
the light into a
wide flood or a narrow spot. Fill lights are usually
large, with
scoop-like reflectors. To soften the light, sometimes
several are
used side by side. Professional soft lights have
the lamps inside a
big white box that reflects the light smoothly
over a larger surface.
Fiberglass or steel mesh scrims can be slid in front of lights
to
soften their beams. Colored gels can be slid into
the same slots to
change the color of the lights. Hinged flaps called
barn doors,
affixed to the front of the instrument allow the
beam to be aimed and
shielded from certain areas of the stage. A backlight,
for instance,
would have the top barn door turned down like
a visor so that light
would strike the subject but would be shielded
from the camera.
HMI lights are a favorite for outdoor portable
shooting because
they make a large amount of usable light with
minimal power. For
instance, because of its outdoor-compatible color
temperature and high
efficiency, a 1200 watt HMI light produces just
about as much light as
a 10 kilowatt tungsten lamp after the tungsten
light passes through
the blue gel. HMI lights are less likely to overburden
office or home
electrical outlets, and because of their efficiency
they don't turn
offices and homes into ovens or stress a smaller
building's air
conditioner.
HMI lights have two disadvantages. First, they
are more
expensive than their 3200° K brothers. Second,
the instruments don't
plug directly into a wall outlet. Instead, they
plug into a large and
heavy ballast, a transformer which powers the
light. The ballast
plugs into the wall outlet.
A third solution to the heat/electrical problem
is to use banks
of fluorescent lights such as those available
from Lowel, Videssence,
Balcar, LightTech, and Softtube. Unlike incandescent
lights that
waste 80% of their power creating invisible heat,
fluorescent lamps
create only 20% heat and the rest is light. Because
the fluorescent
tubes comprise large surfaces, the light is "soft",
excellent for soft
shadows and fill, but poor for making pronounced
shadows or forming
strong beams.
If you find yourself shooting in offices where
fluorescent light
already exists, normal fluorescent tubes in one
of the Videssence,
etc. fixtures will create a compatible color temperature.
If you are
working in a studio with 3200 degree K lights,
you will have to use
special 3200 degree K bulbs in your fixtures to
match the color
temperature of your incandescent lights.
Greasy fingerprint -
No basic article TV lights would be complete without warnings
about how to handle them. Never
move a lamp while it is lit.
The hot filament is amost gaseous, making
it very delicate.
If you bump the lamp, the filament may
break apart and the light will go out.
When your light does go out, turn off the fixture's
power
(unplugging it is even safer), and let it sit
while you search for a
replacement bulb. Bulbs and fixtures get hot and
you will fricassee
your fingertips if you go fishing for the bulb
too soon. A glove
might be helpful here.
The replacement bulb's glass should never be touched
with your
fingers. Small amounts of oil from your fingertips
will decrystalize
the glass when it heats up, causing it to crack.
Instead, transport
the bulb by its packing, and slip it into its
socket without touching
the glass with your fingers. Once the fixture
is relamped, you can
plug it in and turn it on.
Don't unplug or plug in fixtures while they are
turned on.
Lusty sparks will jump from the plugs as you make or break an
active
circuit. Turn off the studio dimmer for the light
or throw the light
switch before disconnecting it.
If using extension cords, remember that lights
use a lot of
power. Check the temperature of your extension
cords near their plugs
from time to time; don't wait until you smell
smoke. Also, don't turn
all of your lights on at the same time; the power
surge may trip your
circuit breaker. Office and school electrical
outlets are often good
for 30 amps (3600 watts) and older homes may be
good for only half
that much. Heavy duty extension cords are generally
rated at 15 amps
which translates to 1800 watts of power. You'll
be overworking your
extension cord if you try to run two 1000 watt
lights from it.
Lastly, Murphy's 44th Law of Lighting states that lighting
systems will work during rehearsal but will fail
during the show. The
likelihood of failure increases with the importance
of the show.
Therefore, don't operate lights at the limit of your power capacity.
Also consider that VCRs, cameras, and computers consume power
and do
not perform well on a starvation diet. You may
be able to light the
scene, but the rest of your gadgets will become
undervoltaged
valetudinarians. (Every story should have at least
one word readers
have to look up.)
| About the author | About Today's Video 4th. ed. | Return home |